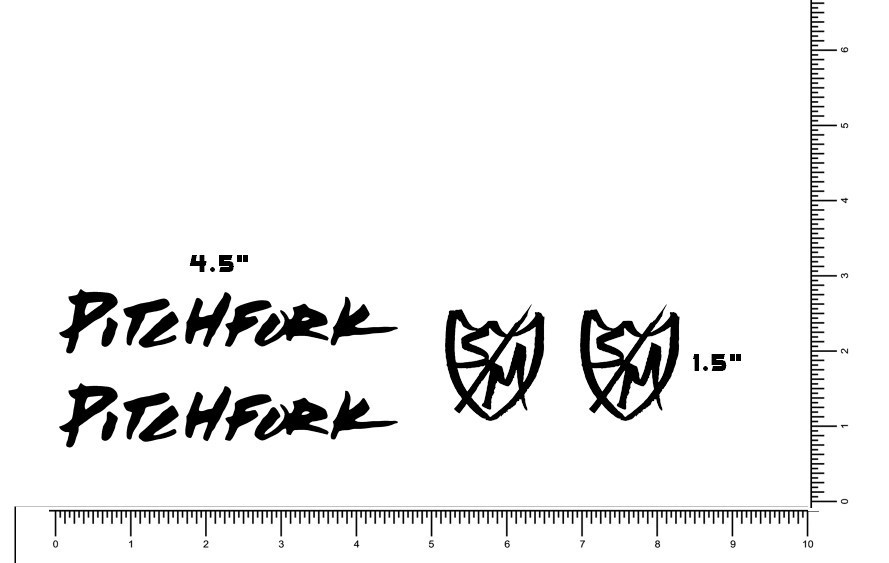
Pitchfork BMX Bikes Die Cut Sticker Pack (2 Decals, S & M)
This Pitchfork die cut sticker pack includes 2 decals designed for BMX bikes, including S & M models. The stickers are in perfect condition with no defects, making them suitable for refreshing a bike frame, helmet, toolbox, or other smooth surfaces. Free shipping is included with the purchase. Check the listing for details on exact sizing, colors, and application recommendations before ordering.
| Location | Pompano Beach US |
| Shipping | Free shipping (check listing for details) |
| Seller |
sticker-gator
99.6% positive · 6753 feedback
|
| Listing | FixedPrice · Active |
| Start time | 2026-03-03T04:30:27.000Z |
| Finish | Matte Black |
| Brand | S&M |
| Number of Items in Set | 4 |
| Personalize | No |
| Type | Decal |
| Color | Black |
| Material | Vinyl |
| Features | Easy to Apply, UV Resistant, Water Resistant |
| Item Length | 4.5" Pitchfork and 1.5" S&M Set |
| Sport/Activity | Cycling |
| Country of Origin | United States |
The Pitchfork Die Cut Sticker Pack includes 2 decals featuring the S&M brand logo, perfect for decorating BMX bikes or other cycling equipment. Made of durable vinyl material, these black decals are easy to apply and resistant to UV and water damage. With a pitchfork design measuring 4.5" and a smaller S&M set design measuring 1.5", these decals are a great addition to any cycling enthusiast's collection, showcasing their love for the sport and the brand. Made in the United States, these stickers are a must-have for those looking to personalize their ride.Instructions:Prepare the Surface:Ensure the surface where you plan to apply the sticker is clean and dry.If needed, use a mild cleaning solution to remove any dust, dirt, or grease. Allow the surface to dry completely.Gather Tools:Have a credit card, squeegee, or any flat, smooth object on hand. This will be used to smooth out the sticker and remove air bubbles.Peel the Backing:Turn the sticker over so that the adhesive side is facing up.Gently peel back a small portion of the backing, exposing the adhesive side of the sticker.Position the Sticker:Carefully place the exposed adhesive side of the sticker onto the desired location on the surface.Align it according to your preference, making sure it's straight and in the desired position.Apply the Sticker:Once the sticker is positioned, use the credit card or squeegee to smooth out the sticker from the center to the edges.Apply even pressure to ensure good adhesion and to remove any air bubbles.Peel Off the Transfer Tape:If your sticker comes with a transfer tape, peel it off slowly and at a sharp angle, making sure the sticker adheres to the surface.Smooth Out Any Bubbles:If you notice any air bubbles, use the credit card or squeegee to gently push them toward the edges of the sticker, allowing them to escape.Final Check:Carefully inspect the sticker to ensure it's securely adhered to the surface with no bubbles or wrinkles.Let It Set:Allow the sticker to set and adhere to the surface for at least 24 hours before exposing it to extreme conditions, such as water Following these steps should result in a well-applied die-cut sticker. Remember to take your time and be patient during the process to achieve the best results.eBay Standard Envelope Shipping: You can monitor your order's progress directly in your Purchase history on eBay ? the tracking number is specific to eBay's system.Tracking updates come from automated scans as the envelope moves through USPS sorting facilities (no manual scans at drop-off or delivery). It often shows "Delivered" when it reaches your local post office, with actual arrival in your mailbox typically within 1-5 days after that. Most buyers receive their items on time, even if updates are limited or delayed.